Print, Scan and Copy on University Printers
There are printers to use across all campuses that you can send your print through to. Please remember to take your ID card with you to scan at the printer in order to collect your print.
You will also need to have put some money into your print account if you are a student.
How to Print, Scan and Copy
MFDs
In the University you can print, scan or copy using any of the Multi-Function Devices (MFDs) located on the University Campuses. MFD’s are Multi-Function Devices that can be used for printing, scanning or copying.
The University uses a system called “Follow You Printing” to enable students to use the MFDs to print, scan or copy. Prints are released by scanning your University ID card at the MFD and they are paid for by the credit in your Print Account, so to print using an MFD you will need:
• Your University ID card
• Enough credit in your print account to pay for your printing.
To add credit to your print account or to check your print credit balance click here https://secure.wlv.ac.uk/printcredit//
The first time that you use an MFD you will need to register your University ID card using the card reader situated on the right hand side of the MFD (see below). You should only need to do this once. Once you have registered your card in future you just need log in by holding your University ID card over the card reader, or if you don’t have your ID card to hand you can log in manually using the display screen on the MFD.
Digital Print Services
Alternatively, you can use the services offered by the on-site University print room, called Digital Print Services which is located in MKb, off Molineux Street, City Campus, at the rear of the George Wallis (MK) Building. DPS will print and bind your document for you and they also offer a comprehensive range of digital print and print finishing services which are available to all students at competitive prices.
Help with Printing, Copying and Scanning
If you have problems with printing, scanning or copying using an MFD (Multi-Function Device), please ask for help.
If you’re using an MFD in one of the libraries and you have a paper jam or need the toner/paper replaced please ask a member of library staff.
If you are using an MFD that is not located in a library please contact the Key Contact listed on the notice next to the MFD to report a problem.
If you find that you still need help, please contact the IT Service Desk on extension 2000 (01902 322000) during their opening hours. You will need to provide the following information:
- Your IT username
- Nature of the problem / error message
- Where you are experiencing the problem eg MX Building 3rd Floor
- The DPS no. of the relevant printer, displayed on the front of every MFD.
The Service Desk Advisor that takes your call will pass your query onto specialist technical staff, who will investigate and get back to you as soon as possible.
How to Register your University ID Card at an MFD
The first time that you use a Multi-Function Device (MFD) you will need to register your University ID card using the card reader on the right-hand side of the MFD. You should only have to do this once. The next time you use an MFD you just need hold your ID card over the card reader and the MFD will log you in.
To register your card for the first time, please follow the instructions below:
1. Hold your University ID Card over the card reader as shown in the picture below:
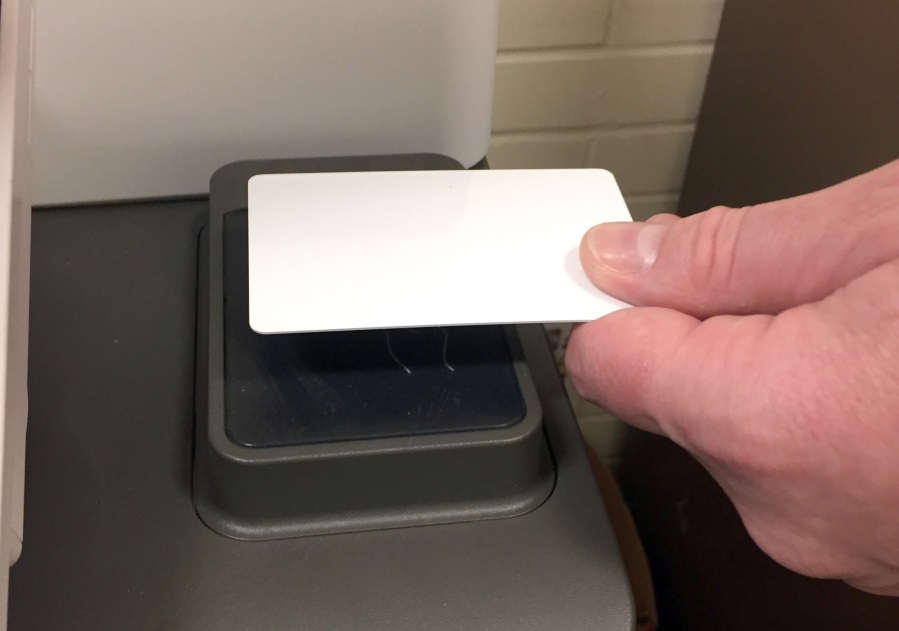
2. Once you have done this the screen shown below will load for you to enter your User ID.
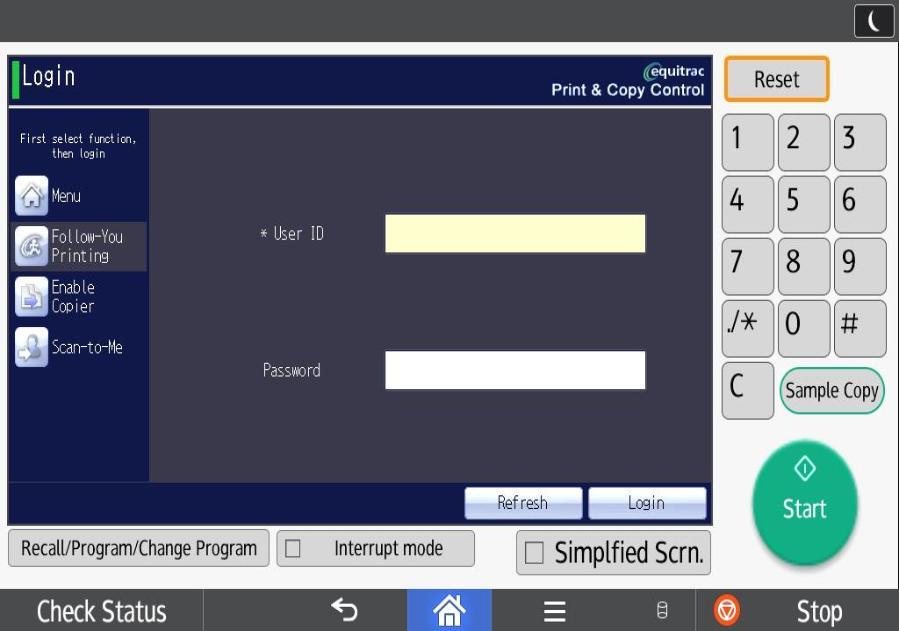
3. Click in the User ID box and the screen shown below will load. Enter your User ID and select “OK”.
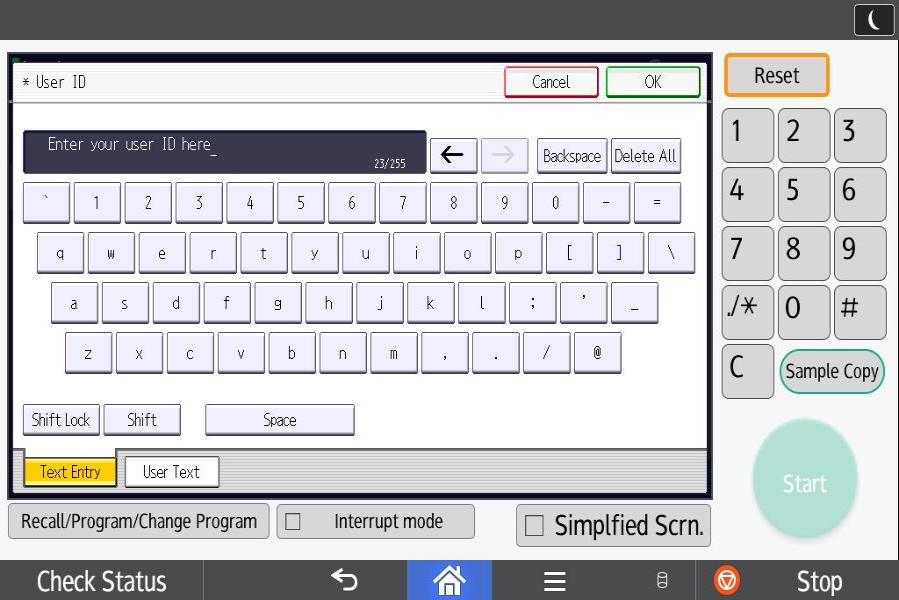
4. When you have done this the screen below will load.
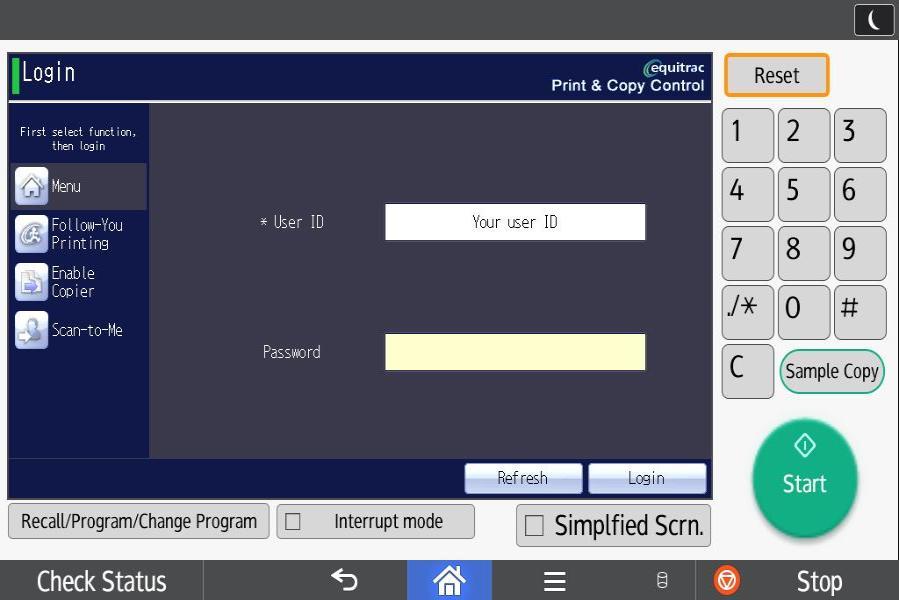
5. Click in the Password field and the screen below will load.
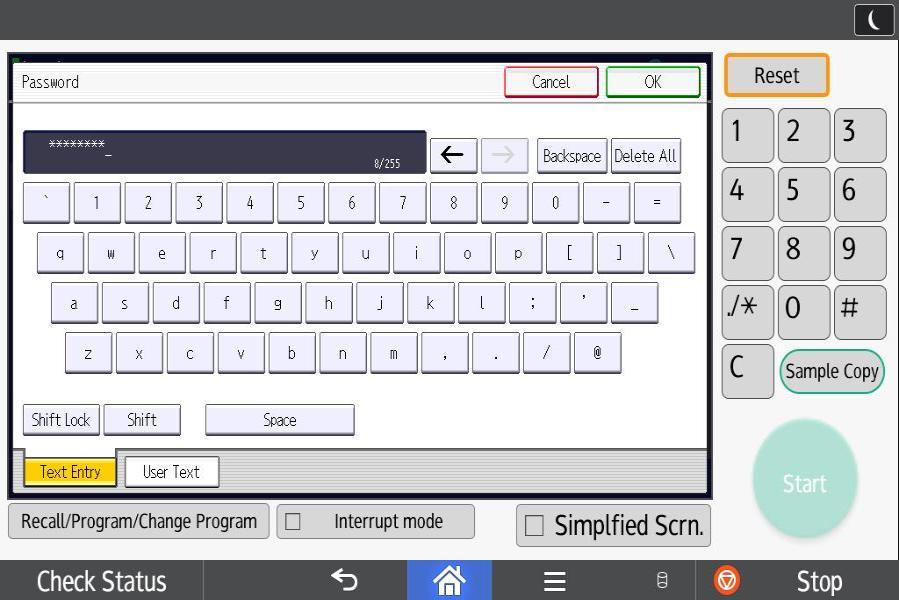
6. Enter your password and then select “Login”. The MFD should then log you in and your card will have been registered.
What is my Print Account?
All students are automatically assigned a Print Account when they receive their University IT log-in ID. You can use this Print Account to pay for all services provided by the Multi-Function Devices (MFDs), such as printing, scanning or copying. You need to add credit to this account before you can use the MFDs for printing or copying. From 1st January 2024 scanning is free of charge.
How do I add credit to my Print Account?
Before you can use an MFD to print or copy you need to load some credit onto your print account. To do this you use the University’s web payment gateway. You can access this via the following link: https://papercut.wlv.ac.uk/user Log in with your University IT login and password and select “Add Credit” from the left-hand menu. The minimum top-up amount is £5 and the maximum is £100.
How to check your Print Account Balance
You can check your print account balance at any time by accessing the University's web payment gateway https://secure.wlv.ac.uk/printcredit//
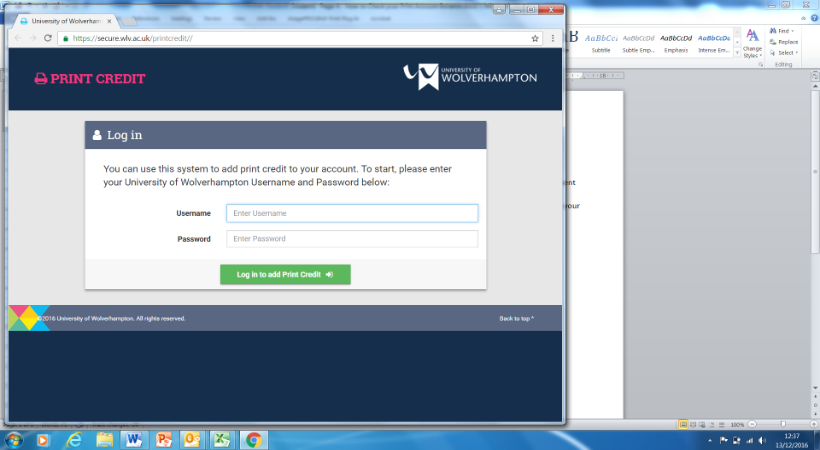
Log in to the payment gateway and your current print credit balance will be displayed on screen.
Your opening Print Account Balance will also be displayed on screen at any MFD when you login. Please note after you have used an MFD to print, scan or copy your print balance will not be adjusted until you have logged out of your account and logged back in again.
Refund Policy
You can obtain a refund of your paid print credit at any time by emailing the University cashiers on Incomesection@wlv.ac.uk Balances below £1 will not be refunded. Refunds will be made back to the card that made the original payment. Any allocated credit, which the University may have given you, will not be refunded.
Printing Documents Guide (Word doc 640k)
Printing Documents Guide (Student) (Word doc 570k)
How to Scan on a Multi-Function Device (MFD)
You can scan using any of the Multi-Function Devices (MFDs) located on the University Campuses. The University uses a system called “Scan to me” to enable students to use an MFD to carry out scanning. Scans are charged at the rate of 1p per scan, regardless of whether you are scanning A4 or A3, black and white or colour, so to carry out any scanning you will need:
• Your University ID card
• Enough credit in your print account to pay for your scanning.
To add credit to your print account or to check your print credit balance click here https://secure.wlv.ac.uk/printcredit//
The first time that you use an MFD you will need to register your card at the scanner (please see the How to Register Your University ID Card section). You should only need to do this once. Once you have registered your card in future you just need to login by holding your card over the card reader situated on the right-hand side of the MFD.
Before you start to scan, your attention is drawn to the regulations regarding scanning or copying of material that is covered by Copyright Regulations. For more information about Copyright Regulations in the University click here. For information regarding Copyright in general please view the Copyright Licensing Agency website.
How to Scan
1. Go to the MFD that you wish to use for scanning.
2. Place the document that you wish to scan face up in the document feeder, or face down on the glass. If you are scanning part of a book the hinged cover on the MFD can be raised at the back so that the device cover lies flat across the book.
3. Before you start scanning you need to login. If the MFD has not been used recently the display panel will be black because the device is in “sleep mode”. Touch the panel to wake it up and the screen will come back on.
4. To log in using your University ID Card hold your card over the card reader situated on the right hand-side of the MFD. The card reader will log you into your print account.
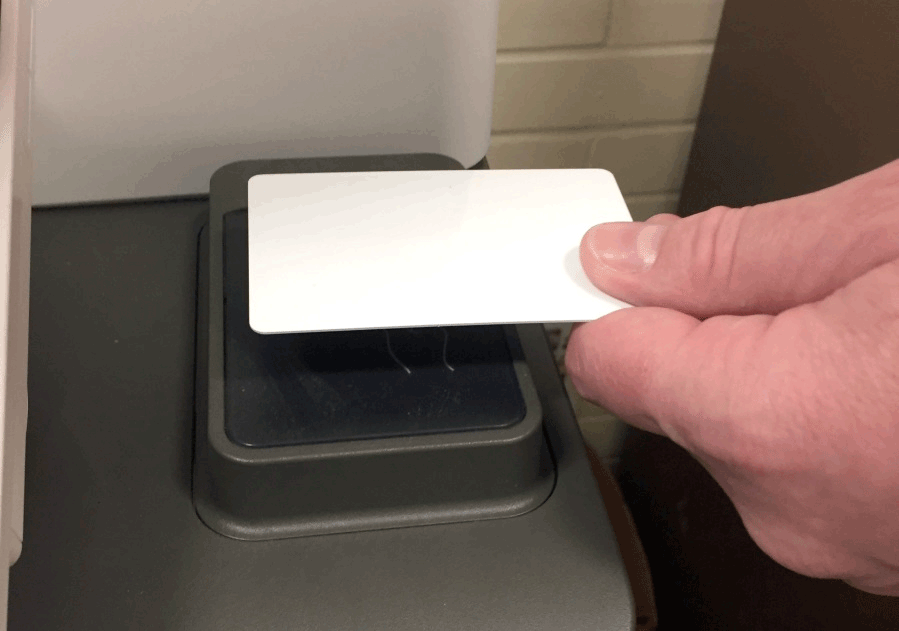
5. If you don’t have your University card available you can log in manually by typing in your user ID and your password into the display panel and then pressing “login”.
6. Click “Login” on the touch screen and the screen shown below will load.
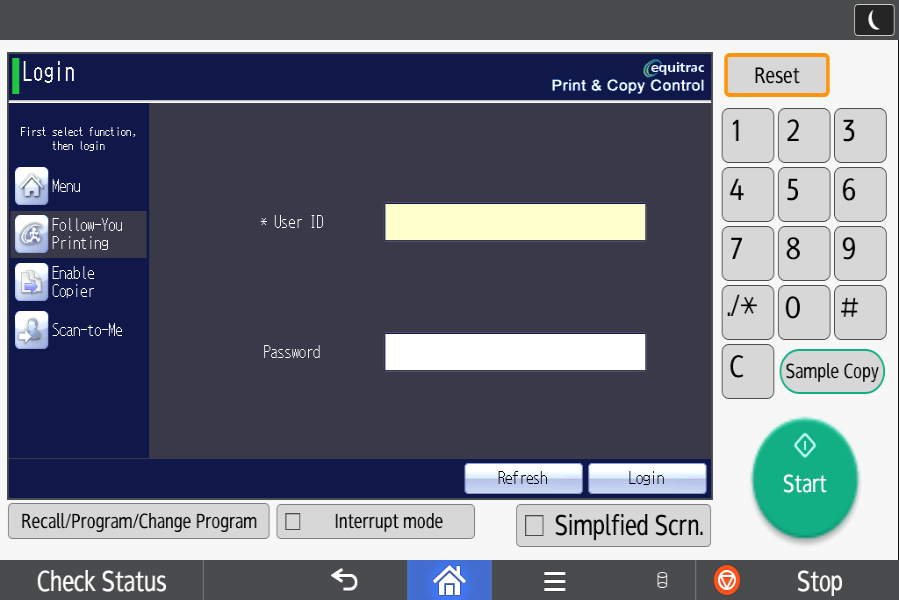
7. Click in the User ID box and the screen shown below will load. Enter your User ID and select “OK”.
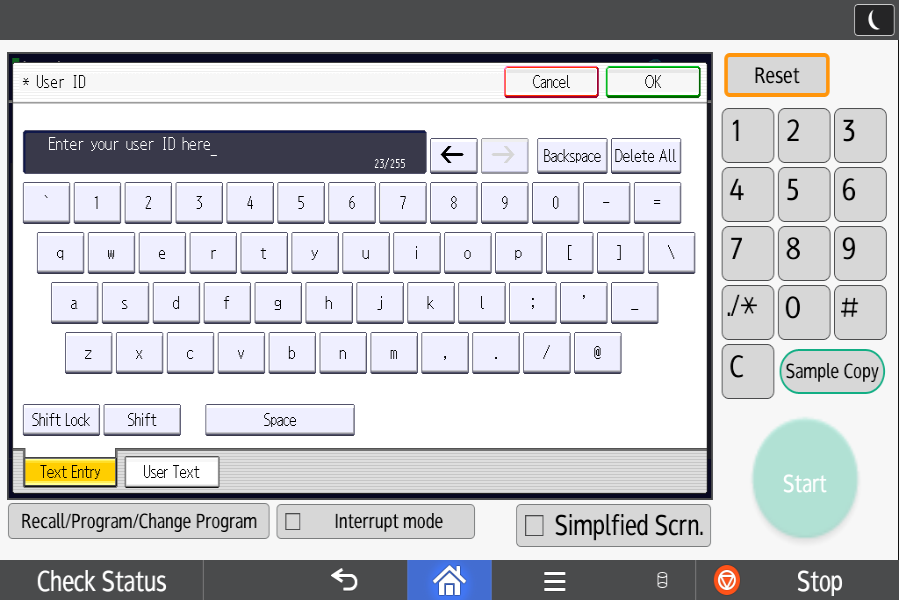
8. When you have done this the screen below will load.
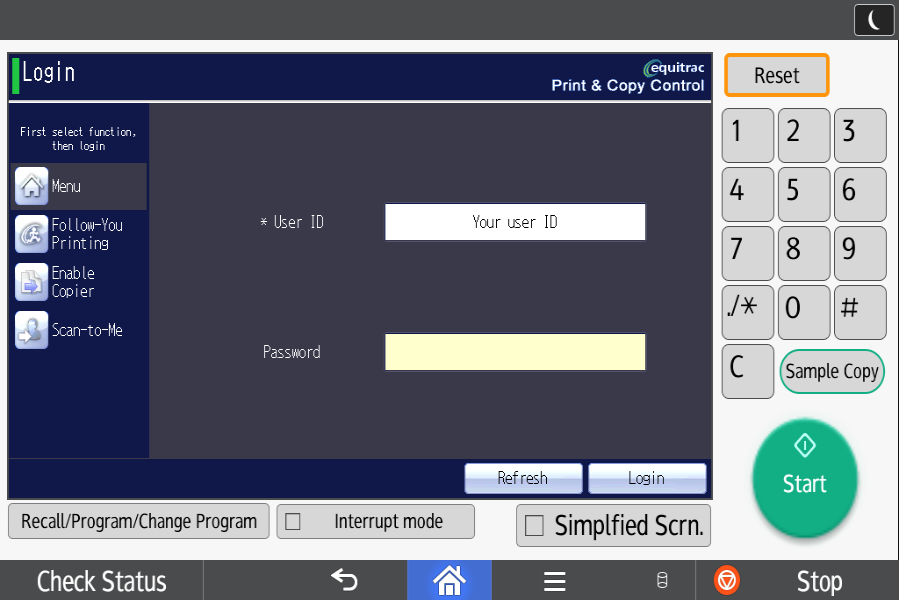
9. Click in the Password field and the screen below will load.
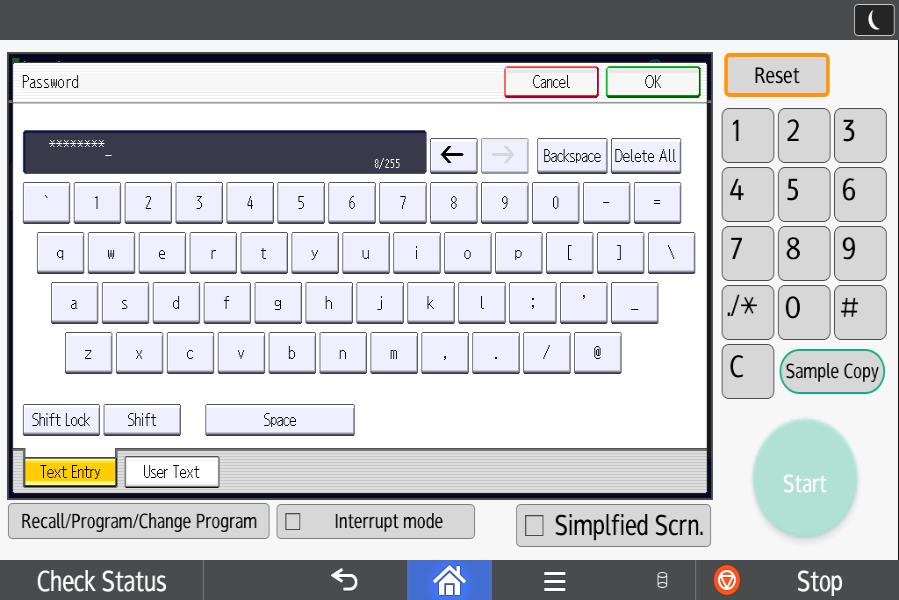
10. Enter your password and then select “Login”. The MFD should then log you in.
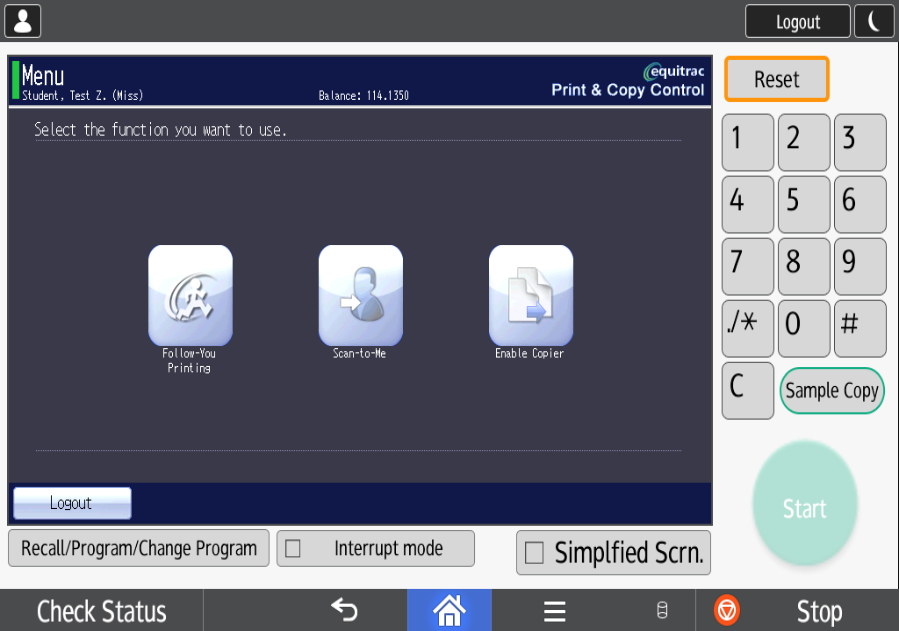
11. Having logged in, you will see three icons on the panel: “Follow You Printing”, “Scan to me” and “Enable Copier”.
12. Use the touch screen to select “Scan to me”.
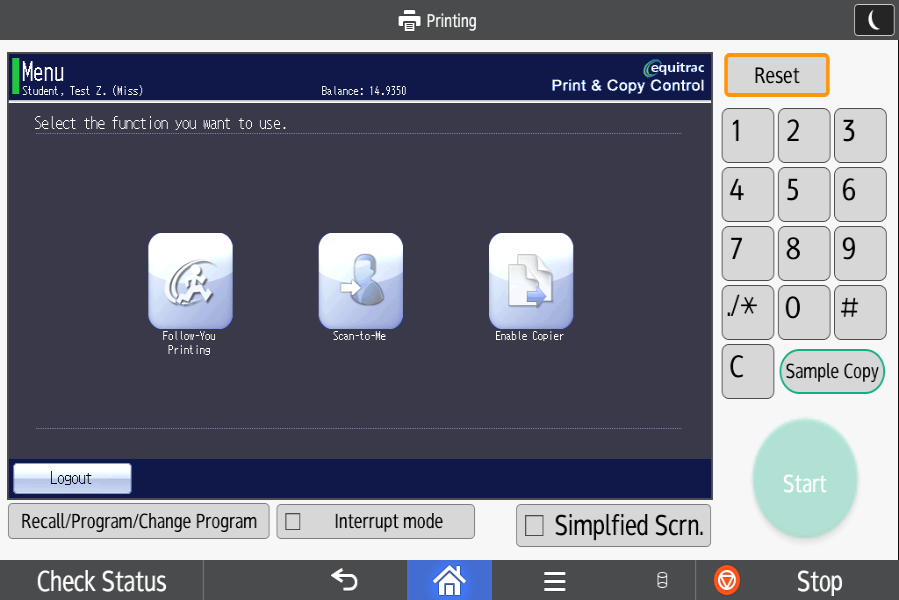
The following screen will then load:
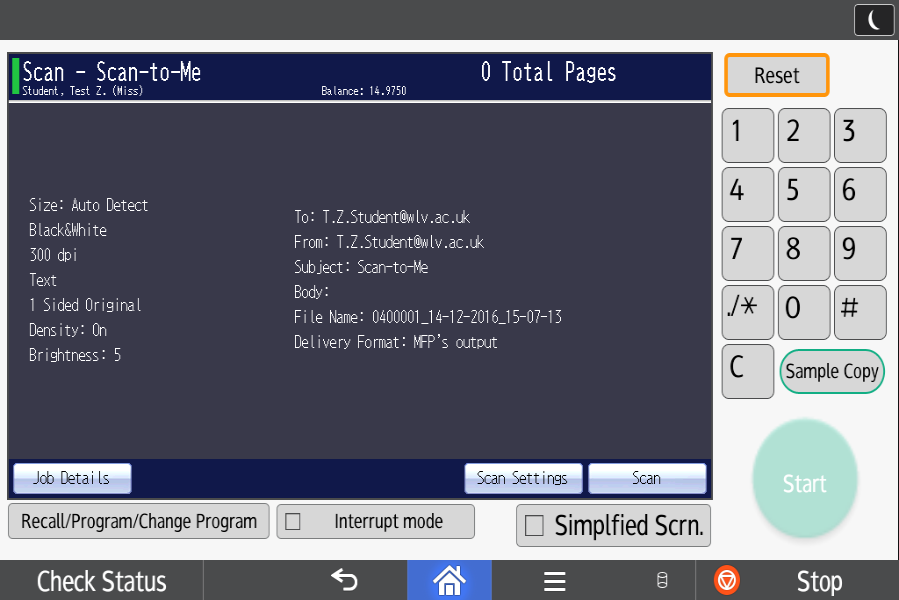
Job Details
13. The default subject title for your scan is “Scan-to-Me”. You don’t need to alter this unless you want to, but if you click on “Job Details” the screen shown below will load and you can change the subject title for your scan by typing into the Subject Box. This will then appear as the subject heading of the email containing your scan file, that is sent to your University email address.
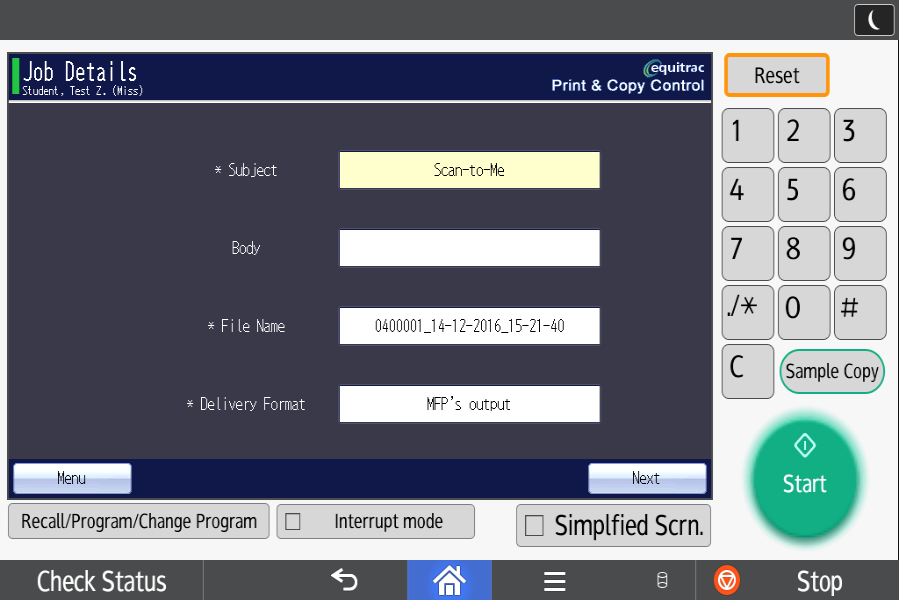
14. Then click “Next” to return to the “Scan –to-Me” screen.
Default Scan Settings
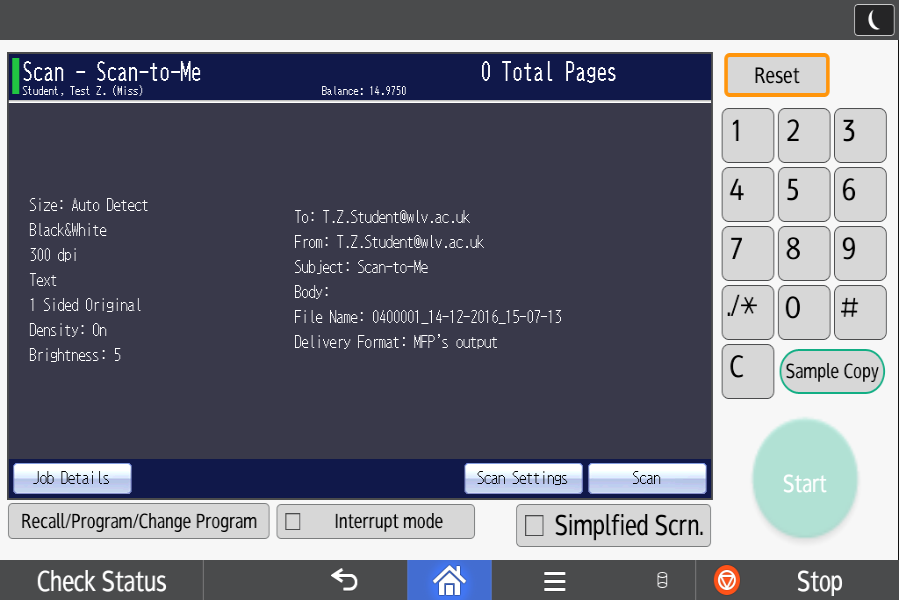
15. On the MFDs the default selections are:
• Size: Auto Detect
• Black and White
• 300 dpi
• Text
• 1-sided original
If you don’t wish to change the default selections you can just select “Scan” to start scanning.
If you want to change the default scan settings select “Scan Settings” and the screen below will load. Here you can alter the options from black and white to colour, from 1-sided original to 2-sided original, change the dpi that your job is scanned at, etc. The default scan resolution is set to 300 dpi. The higher the dpi you select, the larger the file generated will be.
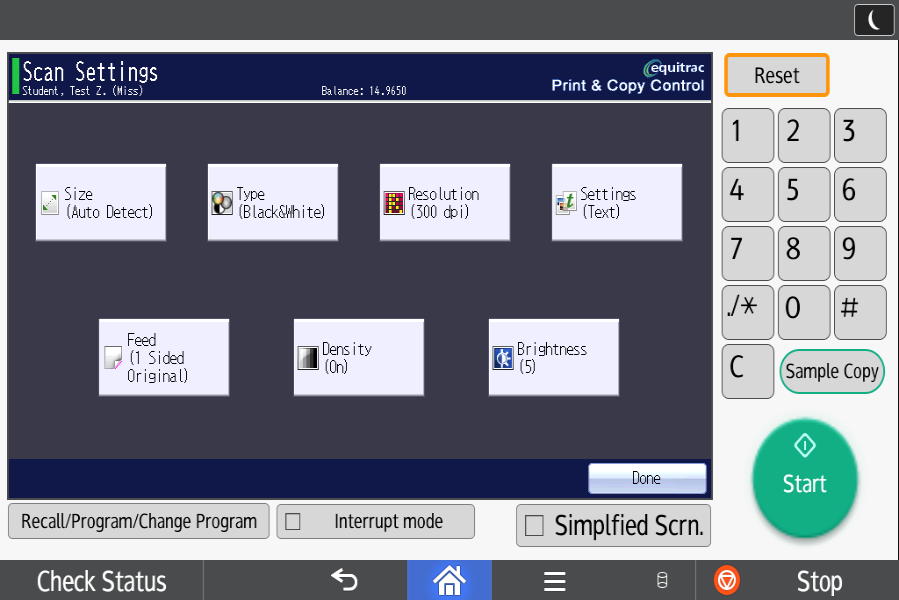
16. Once you have made your selections select “Done”. The display will revert to the Scan-to-Me” screen shown below. You are now ready to scan, so select “Scan” to scan your document.
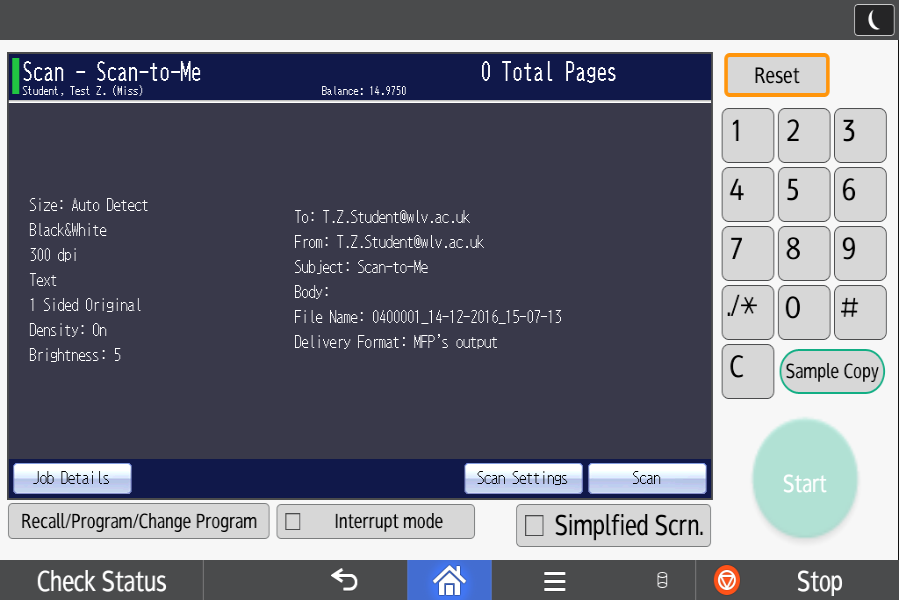
17. Once you have selected “Scan” your document will be scanned and the screen below will load. Select “Done” to complete the job.
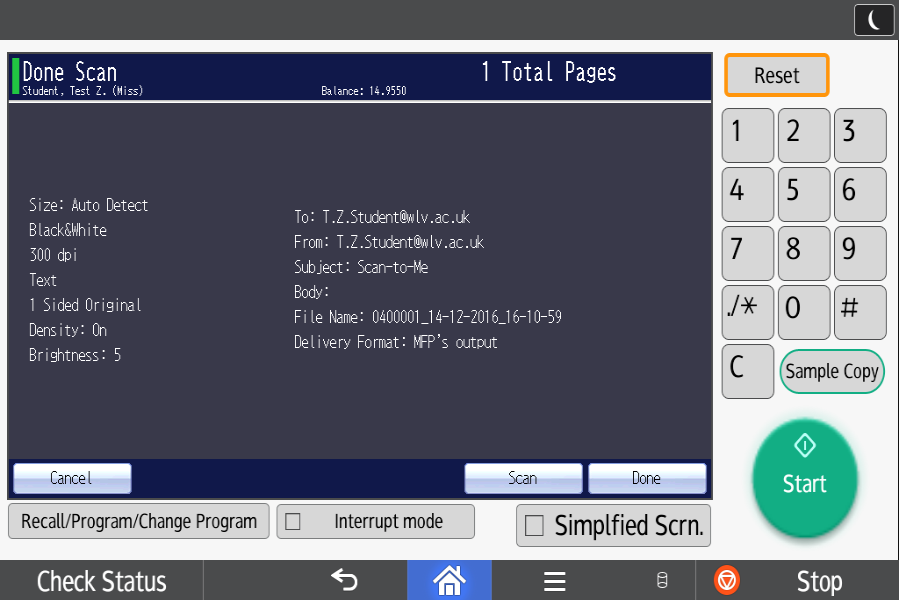
18. Having selected “Done” the screen below loads. On this screen you have three options:
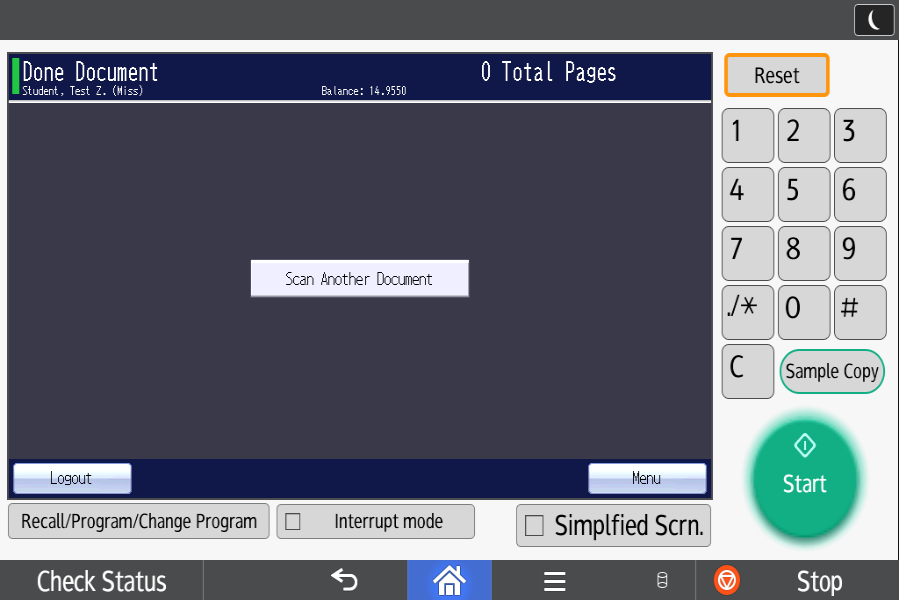
a. Scan another document.
b. Logout by selecting the “Logout” icon or by holding your ID card over the card reader on the right hand side of the MFD.
c. Return to the main menu if you wish to carry printing or copying by selecting “Menu”.
19. Once you have finished scanning it is important that you log out, either by selecting “Logout” on the display screen or by holding your ID card over the card reader again. No-one else can use your print account to print or scan, but if another user approaches the MFD immediately after you have been using it and you have not logged out they could potentially use your account to carry out copying. The MFD will automatically log you out after two minutes if you have not touched the screen.
20. Having completed your scanning check your University email inbox. The scans you have produced will appear in your inbox.
You can copy using any of the Multi-Function Devices (MFDs) located on the University Campuses. Copying is paid for by credit in your Print Account, so to carry out any copying using an MFD you will need:
• Your University ID card
• Enough credit in your print account to pay for your scanning.
To add credit to your print account or to check your print credit balance click here https://secure.wlv.ac.uk/printcredit
The first time that you use an MFD you will need to register your card at the scanner (Link to page 2 – how to register your ID card at an MFD). You should only need to do this once. Once you have registered your card in future you just need to login by holding your card over the card reader situated on the right-hand side of the MFD or selecting “Login” on the touch screen.
Before you do any copying, your attention is drawn to the regulations regarding copying or scanning of material that is covered by Copyright Regulations. For more information about Copyright Regulations in the University click here. For information regarding Copyright in general please view the Copyright Licensing Agency website.
How to Copy
1. Go to the MFD that you wish to use for copying.
2. Place the document that you wish to copy face up in the document feeder, or face down on the glass. If you are copying part of a book the hinged cover on the MFD can be raised at the back so that the device cover lies flat across the book.
3. Before you start copying you need to login. If the MFD has not been used recently the display panel will be black because the device is in “sleep mode”. Touch the panel to wake it up and the screen shown below will load.
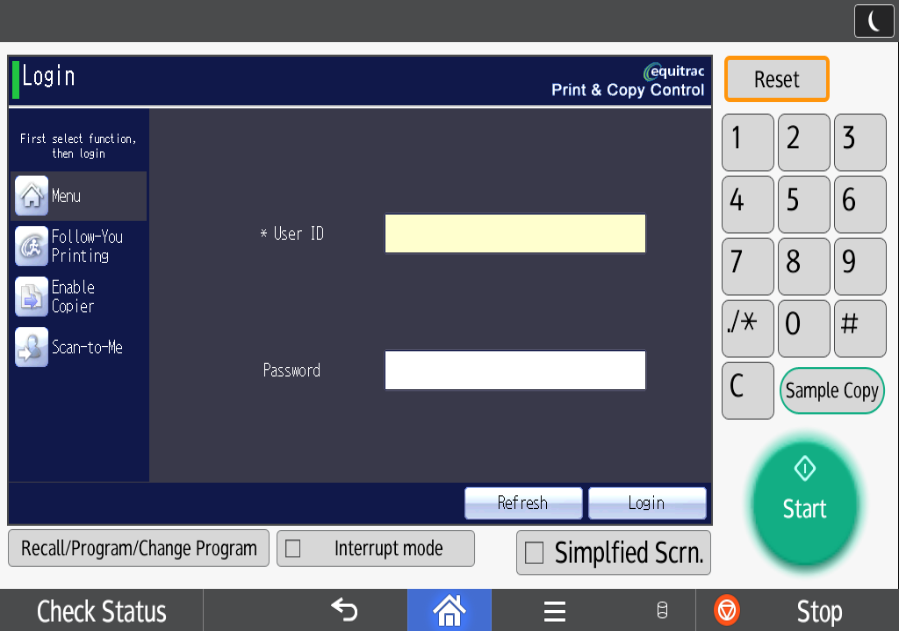
4. To login using your University ID Card hold your card over the card reader situated on the right hand-side of the MFD. The card reader will log you into your print account.
5. If you don’t have your University card available you can log in manually by typing in your user ID and your password into the display panel and selecting “Login” on the touch screen.
6. Click in the User ID box and the screen shown below will load. Enter your User ID and select “OK”.
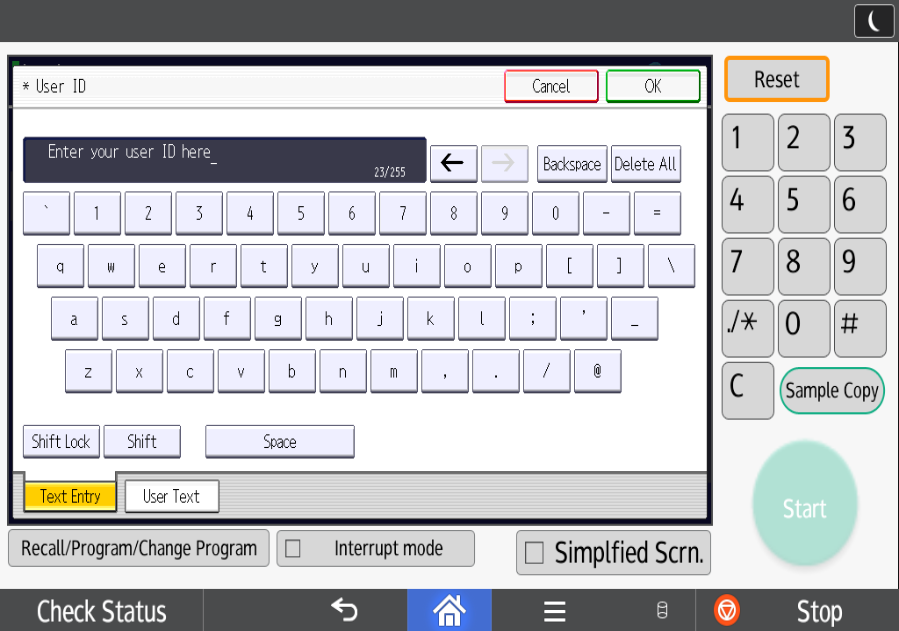
7. When you have done this the screen below will load.
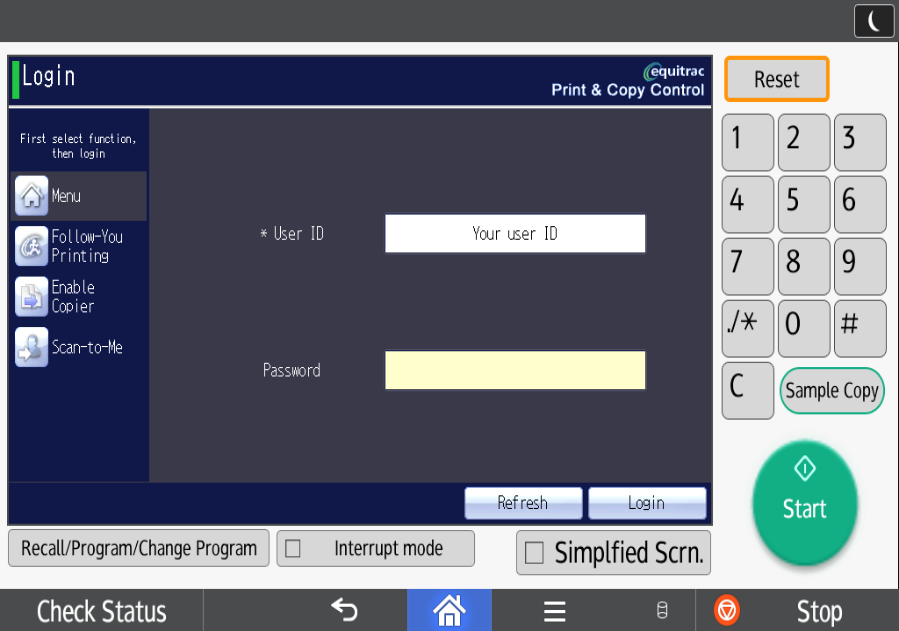
8. Click in the Password field and the screen below will load.
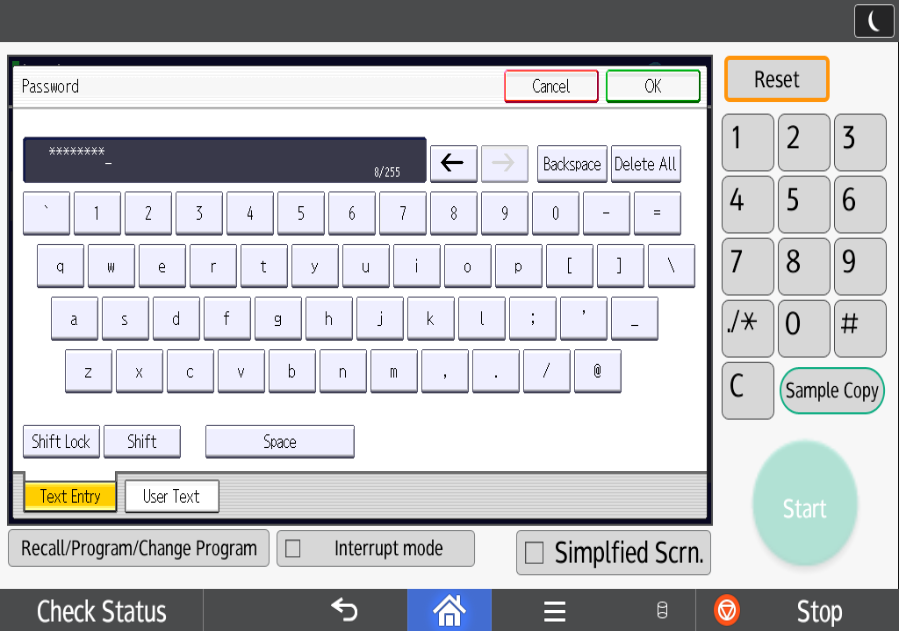
9. Enter your password and then select “Login”. The MFD should then log you in.
10. Having logged in, the screen shown below will load, with three icons: “Follow You Printing”, “Scan to me” and “Enable Copier”.
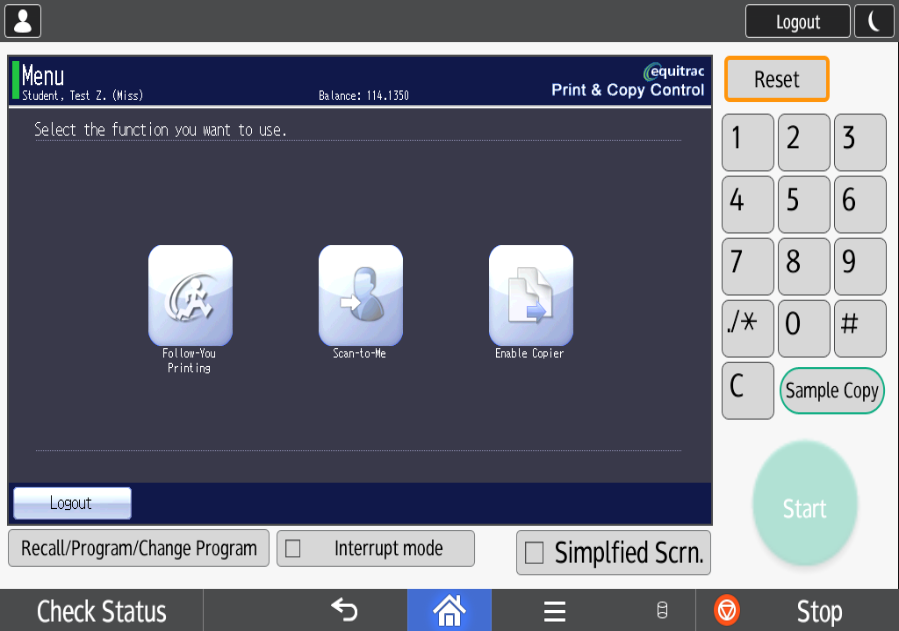
11. Use the touch screen to select “Enable Copier” and the copier screen shown below will load.
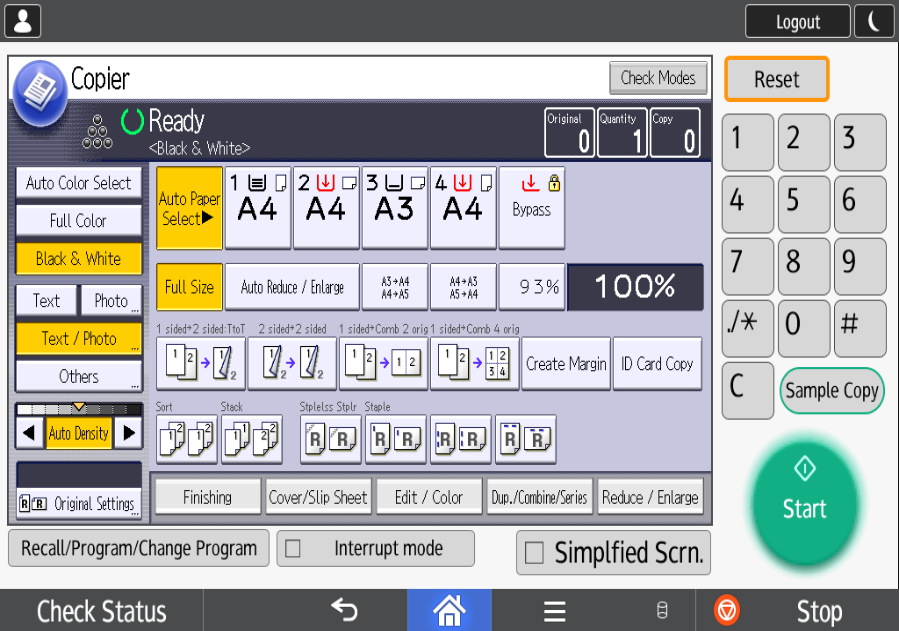
12. Default Copying Settings
The default selections in copier mode are:
• Black and White
• Text & Photo (this refers to the type of original you are copying)
• Auto Density
• Auto Paper Select
• Full Size – 100%
• 1-sided to 2-sided (single-sided originals will print as a double-sided copies)
• Quantity: 1
You can change any of these settings if you wish.
If you require multiple copies use the numeric key pad on the right-hand side to select your desired quantity and then press “Start”.
13. If you have finished copying and you don’t wish to use the MFD to do any printing or scanning you should logout, either by holding your ID card over the card reader on the right-hand side of the device or by selecting “Logout” on the touch screen.
14. If you wish to continue printing or scanning select the blue “Home” key on the bottom of the touch screen to return to the Print, Scan-to-Me, Enable Copier screen.
15. Once you have finished copying it is important that you log out, either by selecting “Logout” on the touch screen or by holding your ID card over the card reader again.
No-one else can use your print account to print or scan, but if another user approaches the MFD immediately after you have been using it and you have not logged out they could potentially use your account to carry out copying. The MFD will automatically log you out after 60 seconds if you have not touched the screen.
Please see the instructions below for both Students, Staff and External Customers.
Mobility Print - Students - Non-University Devices (Word doc 279k)
Mobility Print - Staff - Non-University Devices (Word doc 280k)
Mobility Print - External (Word doc 513k)
New MFD Printing Prices Effective 1st January 2024
| Type of Print | MFDs New Price | Type of Print | MFDs New Price |
|---|---|---|---|
| A4 Mono - Single Sided | 5p | A4 Mono - Double Sided | 9p |
| A3 Mono - Single Sided | 10p | A3 Mono - Double Sided | 19p |
| A4 Colour - Single Sided | 19p | A4 Colour - Double Sided | 37p |
| A3 Colour - Single Sided | 38p | A3 Colour - Double Sided | 75p |
From 1st January 2024, scanning will be free of charge.


/prod01/wlvacuk/media/departments/digital-content-and-communications/images-18-19/iStock-163641275.jpg)
/prod01/wlvacuk/media/departments/digital-content-and-communications/images-2024/250630-SciFest-1-group-photo-resized-800x450.png)
/prod01/wlvacuk/media/departments/digital-content-and-communications/images-18-19/210818-Iza-and-Mattia-Resized.jpg)
/prod01/wlvacuk/media/departments/digital-content-and-communications/images/Maria-Serria-(teaser-image).jpg)
/prod01/wlvacuk/media/departments/digital-content-and-communications/images-2024/241014-Cyber4ME-Project-Resized.jpg)
/prod01/wlvacuk/media/departments/digital-content-and-communications/images-18-19/210705-bric_LAND_ATTIC_v2_resized.jpg)