Using Presto Flow
Presto Flow is the workflow support system used at the University of Wolverhampton to help Academic Coaches, Skills Coaches and Personal Tutors monitor student attendance. This system provides useful information to inform our application of the University of Wolverhampton’s Student Engagement Policy and Apprenticeship Engagement Policy, which is designed to support success for all of our students.
Coaches and Tutors should have access to information on their tutees' attendance, and system generated interventions, on this site. You can find the system at https://flow.attendance.wlv.ac.uk/. The system uses the University's single sign-on so you don't need any additional log on details.
If you are teaching classes, as well as acting as a personal tutor to students, it is recommended that you access the guidance pages on the Student Check-In digital register system, prior to working through the Presto Flow guidance, for the best idea of how the systems feed into each other. For example, the information inherited by Presto Flow depends on the use of the Check-In system and, in turn, accurate timetable information.
Use the instructions below to access your interventions, respond to interventions and access attendance information for your students at any point. Further guidance is available in the FAQs further down this web page.
You can also watch this video which covers a basic introduction to the system, responding to interventions, escalating cases and an overview of the workflow used in the system.
| Icon Graphic | Description |
|---|---|
| Menu Icon: This is found in the top left corner, and when selected will present the user with a drop-down list of navigation options. | |
| My Issues Icon: The ‘My Issues’ icon can be found in the drop-down menu on the left-hand side of the page. Selecting this icon will redirect the user to the ‘My Issues’ page, in which they will see an overview of their personalised student cases. | |
| Students Icon: The ‘Students’ icon can be found in the drop-down menu on the left-hand side of the page. Selecting this icon will redirect the user to the ‘Students’ page, in which they have oversight of cases for students they have a relationship to. This information will be informed by the user’s role and Faculty based permissions. | |
| Issues Icon: The ‘Issues’ icon can be found in the drop-down menu on the left-hand side of the page. Selecting this icon will redirect the user to a page with oversight of more cases than those that are assigned to them. | |
|
|
Search Bar: If available in the menu, the Search Bar allows users to search for students in Presto Flow, regardless of whether they have an open case. If available within Flow (in the top right corner, as opposed to within the menu dropdown) the Search Bar in the allows users to search for keywords to, either, find a specific case, or only view specific case types. (NOTE: To protect the data contained in the system, role and Faculty permissions are in place so you may not have the search bar available for use in both locations and not all users will have access to all student cases.) |
|
|
Filters Icon. The Filters Icon allows users to define which columns are visible. When the user selects this icon, a pop-up will appear. The pop-up details which columns are currently visible. If the user wishes to add or remove any of the columns, they need to select/deselect the corresponding check box as appropriate. |
 |
Sort Filters: User can sort information displayed to them by selecting the arrows adjacent to the column header. |
Step one
Once logged in, you will find yourself on the My Issues screen. This screen provides an overview of all open student cases assigned to you.

Step two
Once you have navigated to the case you wish to look into, to open a case you can click on it’s current status in the ‘State’ column, or the hyperlink in the ‘Issue’ column. This list also displays an ‘Attendance’ column, which will display the student’s attendance percentage from the start of the academic year until the case was created.

Step three
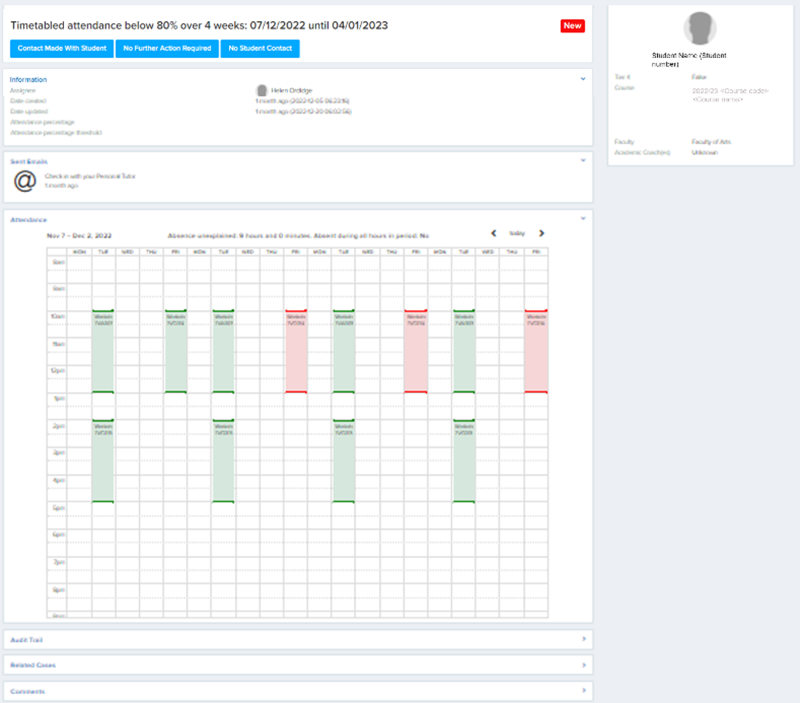
This will open the case and display a range of useful contextual information for you. The widgets on the left side of the screen give you information related to the case such as ‘Attendance’ showing the calendar for the period the case relates to, the opportunity to access ‘Sent Emails’ to view the system generated to the student during creation of the case, ‘Comments’ added by those updating the case, etc. The information on the right of the screen also shows basic information on the student such as their Course and Faculty.
Information
The Information widget provides key information regarding the student case, including the name of the staff member whom the case is assigned to and the attendance percentage of the student for the period of time the case covers.

Sent emails
The email widget enables users to have oversight of any automatically generated emails that have been sent to the student from the system. Clicking on this box will open a pop-up window that displays a copy of the email sent.

Action plan
The action plan widget will display information regarding the student action plan, when this information has been input into the system. If information on an action plan has not been provided, this widget will not be displayed.

Attendance
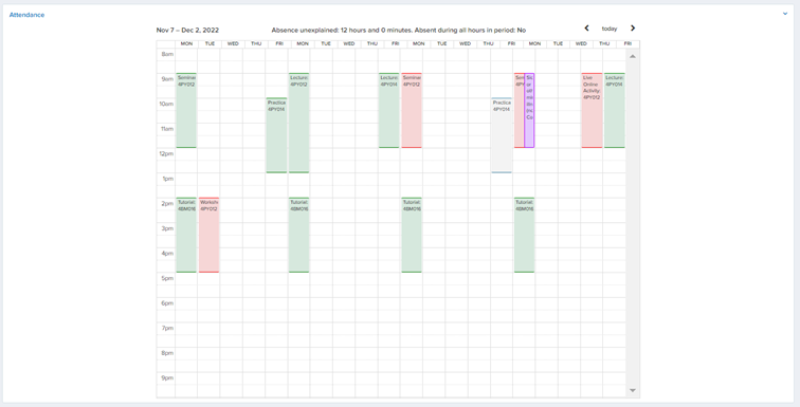
The Attendance widget shows users a calendar overview of student attendance for the student case they are actioning.
Audit trail
The audit trail widget enables users to see any changes or interaction a user has had with a student case. A time stamp will appear next the change.

Comments
The comments widget enables the users to leave written comments on student cases. All comments will have the user’s name visible above the comment, and a time stamp.

In addition to the information contained within the case, you may also have information from outside Presto (for example, you may already have ongoing conversation via email, or in person, with the student on their situation,) that you can reflect on before responding to the intervention. Using all the contextual information, you should respond to the intervention.
Step one
Once you have found and selected the student case you wish to action, you may now manage the case within Presto Flow. Depending on what stage the student case is in, different options will be available to you to move the case along. These options can be found in blue buttons at the top of the student case, underneath the case name.

Step two
When you select an option, a pop-up will appear. Each pop-up is different and relates to the option chosen. In the below example, ‘Contact made with Student’ has been selected.
Some pop-ups will ask for more information regarding the student case and the actions taken, others will only provide a button to select. It is not compulsory to complete the text boxes and radio buttons when moving a case from one stage to another, but it may be useful to provide further information regarding the student case, should you need to revisit the case, or escalate to another user.
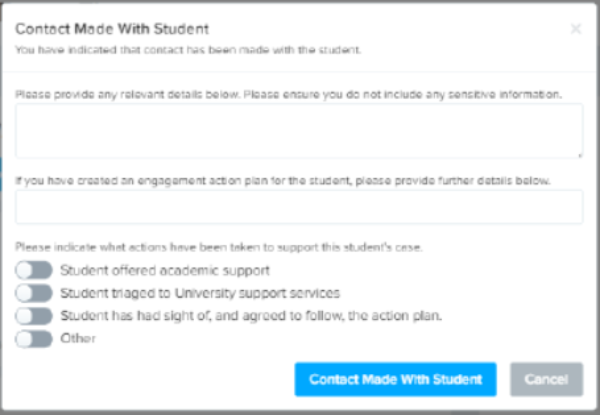
Once you have provided any relevant information, you may select ‘Contact made with student’, this will close the pop-up and move the case to the next stage.
Step three
In this instance, you will now be asked to provide information on whether the contact you have had with the student is satisfactory. You should do this by again selecting one of the blue response buttons at the top of the page. Some options will indicate that, if selected, the case will be closed.


If you do not wish to close the student case, simply select ‘Cancel’ to return to previous page.
IMPORTANT: When the case has been actioned, and you no longer think that the student engagement level is of concern, you may have to repeat steps 2-3 of this process to move the case to a final stage and close it. Student cases must be in a final state in order for the student to trigger again, so leaving cases open and unactioned may prevent students with poor engagement from being identified and supported. You will also receive weekly reminders on cases that are assigned to you that are not in a final state.
If you are unsure when to escalate cases, or who in your department deals with escalated cases, please check with your line manager. The below information gives a walkthrough on how to escalate cases.
Step one
If, after taking action to respond to the case considering all the information available to you, you report within the intervention that an appointment was not attended, there has been no student contact or you are unsatisfied with student contact, you will be able to select an option that allows you to escalate the case.


Step two
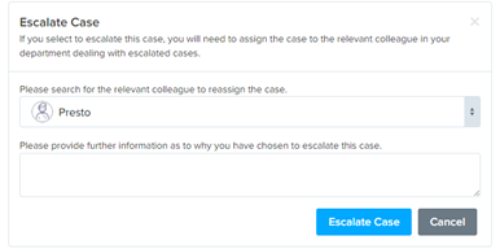
Click on the drop down menu to search for the relevant colleague to reassign the case to.
You should add a brief commentary as to the reason for escalation, to provide further context for the staff member you are escalating the case to. Finally, clicking the blue ‘Escalate case button’ will close the pop up box, and assign the case to another user.
If you are unsure when to escalate cases, or who in your department deals with escalated cases, please check with your line manager as the members of staff who work to re-engage students at this level differs throughout the institution.
Step three
Once the case is escalated, it is expected that the colleague the intervention is now assigned to will investigate the case (with meetings and communications outside of the Presto system) then close the case, either with the student returning to their studies (usually with an agreed action plan in place), or the student being withdrawn in line with the Student Engagement Policy or Apprenticeship Engagement Policy.

If you are a member of staff dealing with escalated cases, the newly assigned case will display in your weekly summary email for action.
Status colour key
|
Initial state - requires attention White text on red background |
Holding state - requires update White text on purple background |
Final state - intervention closed. White text on green background |
|---|
The graphics below have alt text added if these colours are not distinguishable in your view.
(Note: not all statuses are available at every stage of intervention response. Some responses are dependent on previous responses being selected.)
Status |
Explanation |
Final state? |
Subsequent responses available |
|---|---|---|---|
 |
An upcoming appointment has been made with the student to discuss their engagement | No – this intervention requires a further update to confirm if the student attended the appointment or not. This response means the intervention remains open and ongoing action is expected |
or
|
 |
The student did not attend their requested appointment |
No – this intervention requires a further update to confirm the action taken as a result of continued non-engagement. This response means the intervention remains open and ongoing action is expected |
 |
 |
The student has attended an appointment to address the engagement concern raised in the intervention |
Yes – This response means the intervention is closed |
None |
 |
Intervention should be closed following no student contact (usually applied in system archiving, or if student has no further teaching activities) |
Yes – This response means the intervention is closed |
None |
 |
Student response to the intervention has been unsatisfactory (no response, unsatisfactory response or appointment not attended) and the case is being escalated in line with the Student Engagement Policy or Apprenticeship Engagement Policy |
No – The case should be escalated to a colleague in your Department/School who is dealing with such cases of non-engagement. The case will need re-assigning to them as part of this step. This response means the intervention remains open and ongoing action is expected from the newly assigned colleague |  |
 |
After seven days, cases in ‘New’ will change to ‘Case Not Handled’ | No – this intervention still needs addressing. This response means the intervention remains open and ongoing action is expected |
or
|
 |
Option used by Super Users and similar roles with specific permissions only | Yes – This response means the intervention is closed | None |
 |
The colleague dealing with escalated cases has investigated the intervention and resolved the matter. |
Yes – This response means the intervention is closed |
None |
 |
Intervention created and requires initial response from Academic Coach/Skills Coach or Personal Tutor |
No – This status means the intervention has recently been created and initial action is expected |
or
or
|
 |
After an initial assessment, the Academic Coach/Skills Coach or Personal Tutor determines that no further action is required to address the intervention. |
Yes – This response means the intervention is closed | None |
 |
There has been no contact from the student relating to their intervention |
No – this intervention requires an update on what steps were taken next. This response means the intervention remains open and ongoing action is expected |
or
|
 |
The Academic Coach/Skills Coach or Personal Tutor has been satisfied by the contact made with/from the student to address the intervention |
Yes – This response means the intervention is closed |
None |
 |
There has been contact made with the student (either student or coach/tutor initiated) to address the intervention |
No – this response will expect you to confirm if the contact was satisfactory (and the case will be closed) or not satisfactory and what further action is taken. This response means the intervention remains open and ongoing action is expected |
or
or
|
Step one
From the ‘My Issues’ list if you click on a student name, or, click on the three lines next to the University of Wolverhampton logo in the top left to open the menu and then select ‘students’, you can access information for your students at any point.
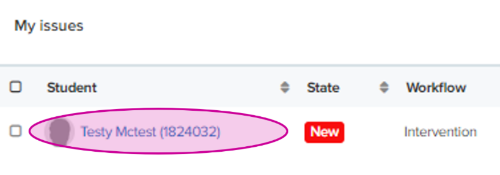
By navigating to this area you will be able to view interventions for students you are the named Academic Coach, Skills Coach or Personal Tutor for, even if they have been assigned to another user (for example if you have escalated a case.)
Step two
Once you have selected a student in your list, you will be able to view information on the attendance records for your tutee including the following:
- A list of issues that have been generated for the student historically. It is worth noting that a workflow or issue with the title ‘Absence Email’ does not indicate a cause for concern. During weeks with timetabled activities for them, if a student has missed any session in that week, the student will receive a summary email highlighting their attendance record, but these emails do not contain a call to action that the student needs to respond to or updates us on.

- The attendance tab holds a weekly view of the student’s timetabled attendance.

- The Engagement tab lists a summary of their weekly attendance percentage across a number of weeks. This can be useful if you are concerned about a change in engagement of one of your tutees across a period of time.

Not all of the tabs in this view are currently used by the University of Wolverhampton so do not be alarmed if they do not contain information.
Overview of the workflow of Intervention generation
PrestoFlow WorkFlow Graphic.
This may be useful for you to have an idea of the responses needed to secure a final state to the case.
FAQS
Faculty operational processes to apply the Student Engagement Policy may differ. You should check with your line manager if you have questions around the process utilised in your Faculty/Department.
NOTE: The University has a bespoke policy and process for Apprentices, please check with the Apprenticeship Hub or your Faculty Apprenticeship Lead if you are concerned about escalating a case related to students on Apprenticeship programmes.
If you have enabled the ‘’Bulk selection’ column to be displayed, while interventions are still in the state ‘New’ you are able to select a number of them by ticking the empty box to the left of the student’s name on the corresponding row of the interventions you wish to respond to. The row(s) you have selected will be highlighted in blue and you will be able to select an initial response to be applied to all of the selected interventions.

Students should not receive interventions once their most recent timetabled activity is no longer within the previous four weeks.
The attendance column displays the attendance percentage for a student from the start of the academic year up to the time that the intervention was generated.
There is not currently a way to temporarily pause interventions to a particular student.
The University has reporting mechanisms to monitor the use of Presto systems, to ensure that students are able to receive supportive interventions. Some of the reports used to show student attendance information, requested by external governing bodies, may pull though information on interventions and comments entered by staff in the resolution of interventions.
By using the search options, Course Leaders should be able to review information on any specific student on their course.
Interventions are generated fortnightly during term time. During the creation of interventions, Presto systems generate emails going to students on a Monday morning. If users log in to Presto Flow early on a Monday morning, they may see interventions listed as ‘created’ while the system is working through this process. If you check the system later in the same day the state will change to ‘New’.
Allocation of Person Tutors and Academic Coaches is usually managed by course teams with support from Faculty professional services teams. Once the update to tutor allocation has been input into e:Vision, cases may remain assigned to the departing tutor, but will now be viewable in the ‘Students’ list of the newly appointed Academic Coach (or Skills Coach) Person Tutor. Some Presto users are also able to re-assign interventions within Presto, please contact your line manager or Head of Department if you are unsure of who can support the reallocation of tutors in your Faculty.
Your tutee will not be able to view the comments you are adding to interventions, but other members of staff with access to search for the student will be able to, as well as members of staff you may have escalated the case to. The comments are also returned in some of the background reporting functions used by particular roles in the system (e.g., reporting used to respond to PSRB requirements, UKVI or similar.) Please bear this in mind when entering your comments.
Interventions are currently generated fortnightly, during term time.
NOTE: Staff with interventions assigned to them that are not in a finished state will receive weekly reminders to address the interventions, but this does not indicate the same frequency of emails to students.
Archiving of interventions takes place on an annual basis, usually shortly after the new academic year starts.
Our systems often keep student IT accounts live 6 months after students graduate, which could mean that students are still being returned in your ‘Students’ list after they have left the university. They should not appear in this list once their IT account with us is closed.


/prod01/wlvacuk/media/departments/digital-content-and-communications/images-18-19/iStock-163641275.jpg)
/prod01/wlvacuk/media/departments/digital-content-and-communications/images-2024/250630-SciFest-1-group-photo-resized-800x450.png)
/prod01/wlvacuk/media/departments/digital-content-and-communications/images-18-19/210818-Iza-and-Mattia-Resized.jpg)
/prod01/wlvacuk/media/departments/digital-content-and-communications/images/Maria-Serria-(teaser-image).jpg)
/prod01/wlvacuk/media/departments/digital-content-and-communications/images-2024/241014-Cyber4ME-Project-Resized.jpg)
/prod01/wlvacuk/media/departments/digital-content-and-communications/images-18-19/210705-bric_LAND_ATTIC_v2_resized.jpg)
/prod01/wlvacuk/its/media/images/2019-re-design/blurb-block/component-1/blurb-block-students-studying-in-class.jpg)
/prod01/wlvacuk/its/media/departments/it-services/images/digital-campus/student-check-in-/Presto-Flow-video-thumbnail-2.jpg)


 or
or


 or
or


